Dasharo Compatibility: Generic test setup
Test setup
Test setup is a set of procedures to be executed before the test execution. Typically, the same setup can be reused by multiple test cases, so there is no need to execute the setup actions before each independent case.
Generic test setup
Firmware
- Obtain
FIRMWAREbinary:- you can download it from
Releasespage dedicated for your platform - or you can build one yourself as shown in the
Building manualpage dedicated for platform which is used by you.
- you can download it from
- Flash
FIRMWAREbinary to the DUT according to the instructions in docs.dasharo for your device.- If the device already has Dasharo, see the
Firmware updatepage - If the device has a different firmware installed, see the
Firmware transitionpage - If the device is bricked, see the
Recoverypage.
- If the device already has Dasharo, see the
OS installation
Install all the supported operating systems.
- Use the ready-to-use disk images by running the
automated disk flashing utility test suite
in case every one, or some of the required
OPERATING_SYSTEMs are available among the ready-to-use disk images. For more details refer to the instructions in the disk flashing utility test suite. - Otherwise, in case the
OPERATING_SYSTEMis supported by Dasharo Preseeds use the instructions from there. - Otherwise continue with the steps below:
OS installer
- Download an
OPERATING_SYSTEMinstaller image - Attach USB stick to the PC.
- Flash
OPERATING_SYSTEMimage to the USB stick. - Attach the USB stick to the
DUT.
Installing the OS
- Power on the DUT
- Enter the boot menu using the
BIOS_SETUP_KEY. - Select the
Boot Menuand pressEnter. - Select the USB stick and press
Enter.- In case of the
Ubuntu 22.04, select theUbuntu (safe graphics)in the GRUB menu.
- In case of the
- Wait for the
OPERATING_SYSTEMinstaller to start. - Install
OPERATING_SYSTEMon the disk. - Power off the DUT.
- Remove the installation media (USB stick with installer).
OS Preparation
Logging in
If the OS was installed using the Dasharo Preseeds the hostname, username and password will be the same as in the OSFV repository. Make sure that the hostname, username and password are the same as in the OSFV repository in order for the automatic tests to run properly if the device already had the OS installed.
- Run PowerShell as an Administrator.
-
Install the OpenSSH Client
Add-WindowsCapability -Online -Name OpenSSH.Client~~~~0.0.1.0 -
Install the OpenSSH Server
Add-WindowsCapability -Online -Name OpenSSH.Server~~~~0.0.1.0 -
Start the sshd service
Start-Service sshd -
Make the sshd service start automatically on startup:
Set-Service -Name sshd -StartupType 'Automatic' -
Confirm the Firewall rule is configured. It should be created automatically by setup. Run the following to verify
if (!(Get-NetFirewallRule -Name "OpenSSH-Server-In-TCP" -ErrorAction SilentlyContinue | Select-Object Name, Enabled)) { Write-Output "Firewall Rule 'OpenSSH-Server-In-TCP' does not exist, creating it..." New-NetFirewallRule -Name 'OpenSSH-Server-In-TCP' -DisplayName 'OpenSSH Server (sshd)' -Enabled True -Direction Inbound -Protocol TCP -Action Allow -LocalPort 22 } else { Write-Output "Firewall rule 'OpenSSH-Server-In-TCP' has been created and exists." } -
If during connection via SSH you want to run
PowerShell.exeinstead ofcmd.exeuse below command:New-ItemProperty -Path "HKLM:\SOFTWARE\OpenSSH" -Name DefaultShell \ -Value "C:\Windows\System32\WindowsPowerShell\v1.0\powershell.exe" \ -PropertyType String -Force -
Sets the PowerShell execution policies for Windows computers.
Set-ExecutionPolicy RemoteSigned -
Use powercfg.exe to control power plans to prevent sleep.
Powercfg /Change standby-timeout-ac 0
Powercfg /Change standby-timeout-dc 0
- Open the terminal.
-
Disable the shutdown confirmation dialogues
sudo gsettings set org.gnome.SessionManager logout-prompt false -
Set up a serial terminal:
sudo nano /etc/default/grub -
Edit the file
/etc/default/grubby addingconsole=tty0 console=ttyS0,115200 console=ttyUSB0,115200n8in variableGRUB_CMDLINE_LINUX_DEFAULT. -
Update grub
sudo update-grub -
Configure SSH:
sudo apt install openssh-server
systemctl start sshd
- Open the terminal.
-
Disable the shutdown confirmation dialogues
sudo gsettings set org.gnome.SessionManager logout-prompt false -
Set up a serial terminal:
sudo nano /etc/default/grub -
Add the following at the end of
/etc/default/grub:GRUB_CMDLINE_LINUX='rhgb quiet console=tty0 console=ttyS0,115200 console=ttyUSB0,115200' GRUB_TERMINAL='serial gfxterm' GRUB_SERIAL_COMMAND='serial --speed=115200 --unit=0 --word=8 --parity=no --stop=1' -
Update grub
sudo grub2-mkconfig -o /boot/grub2/grub.cfg -
Configure SSH:
sudo dnf install openssh-server systemctl enable --now sshd -
Additionally for Using serial via FTDI USB converter
sudo systemctl enable serial-getty@ttyUSB0.service
sudo systemctl start serial-getty@ttyUSB0.service
sudo setenforce 0
NVIDIA drivers - Ubuntu
Only necessary if the device has an Nvidia GPU
- Power on the DUT.
- Wait until the
OPERATING_SYSTEMboots from disk. - Login into the
OPERATING_SYSTEM. - Open a terminal window.
- Search for the newest driver version
sudo apt update
sudo apt search nvidia-driver --names-only
- Install the newest driver (you might find a version higher than 560)
sudo apt install nvidia-driver-560
- A password prompt for secure boot configuration will appear. Choose a
password (you can use your system password) and press
Enter. - Reboot the DUT.
- Upon entry into MOKUtil, select
Enroll MOKand enter the password you chose during driver installation. - Select the option
Continue boot. - Wait until the
OPERATING_SYSTEMboots from disk. - Login into the
OPERATING_SYSTEM. - Open the
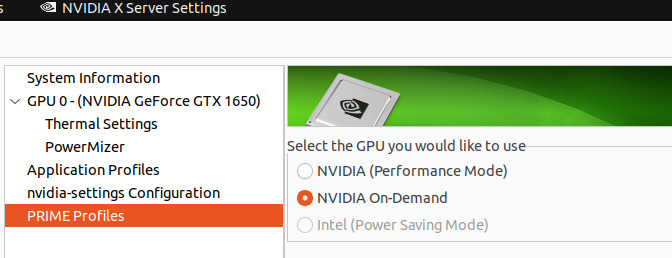
NVIDIA X Server Settingsapplication. - Open the
PRIME Profilessection. - Select
NVIDIA On-demandand apply. - Enter the
OPERATING_SYSTEMpassword when prompted.
Post installation
- Look for an optional
Post-Installation Setupdocument in the device's documentation at the Supported Hardware documentation and perform the instructions in it.
Special cases
Special cases are documented in Open Source Firmware Validation repo docs
