Dasharo menu overview
This section describes the overview of the Dasharo firmware setup menu. In the subsections you will get to know:
- What options are available?
- How to use submenus and options?
- How the options and submenus work?
Here you may watch a Dasharo menu walkthrough with commentary presenting Dasharo features.
Dasharo menu guides
The main menu is entered by selecting the Setup application in the
Boot Manager Menu or by pressing the Setup hotkey
while booting. The hotkey is shown in the top-left corner of the screen when
the boot logo is displayed, for example DEL:
DEL   to enter Setup
F11   to enter Boot Manager Menu
ENTER to boot directly
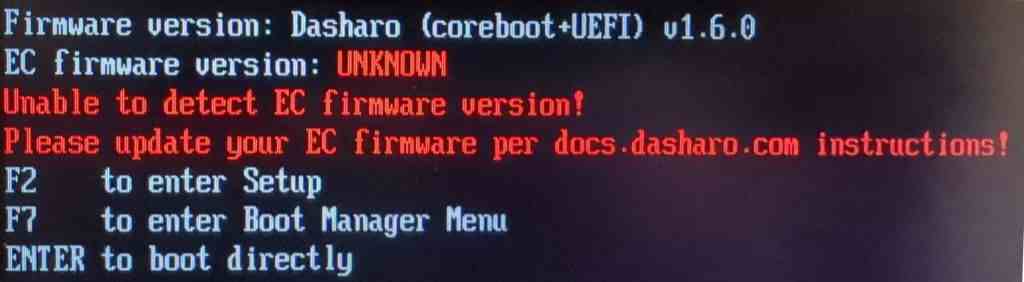
On certain devices like Novacustom laptops one will also be greeted with a firmware version printed on the screen (main firmware version and EC firmware version if applicable), for example:
Firmware version: Dasharo (coreboot+UEFI) v1.6.0
EC firmware version: 2023-03-20_c398446
F2    to enter Setup
F7    to enter Boot Manager Menu
ENTER to boot directly
If any error happens (firmware version is unknown, could not be read or any other error) you will get an red error string:
OR
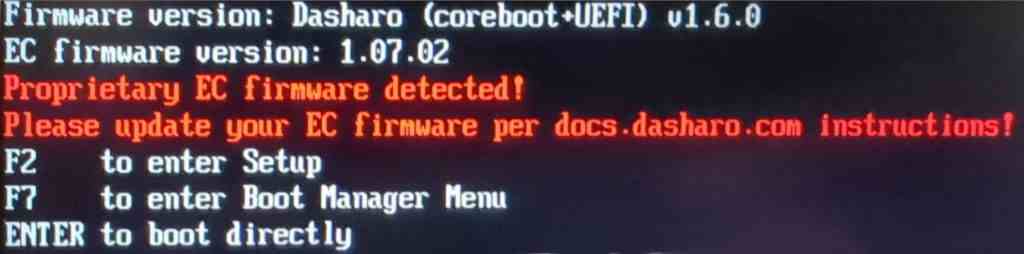
In such case please follow the EC firmware update instructions for a specific board variant.
-
Boot Manager Menu - entered with a different key than used for setup application. Lists all bootable options and allows one to override the boot path.
Hotkeys
F9: Reset to Defaults
- The
F9hotkey is a global reset option. - Pressing
F9will reset all BIOS settings across all menus to their default values. The only exception are the secure boot keys. - This action is immediate and applies to all configurable options within the BIOS.
- Changes will be physically saved and effective on the platform after a reset.
F10: Save Changes
- The
F10hotkey serves as a global save option. - Pressing
F10will save all changes made in any menu within the BIOS. - Changes will be physically saved and effective on the platform after a reset.
Important Notes
- Caution: Using the
F9reset option will overwrite all custom configurations. Ensure you have noted any specific settings before resetting. - Confirmation: Both
F9andF10actions require confirmation to prevent accidental changes. - Reset Requirement: After saving changes with
F10or reverting to defaults withF9, a platform reset is necessary for any changes to take effect.
Main Page
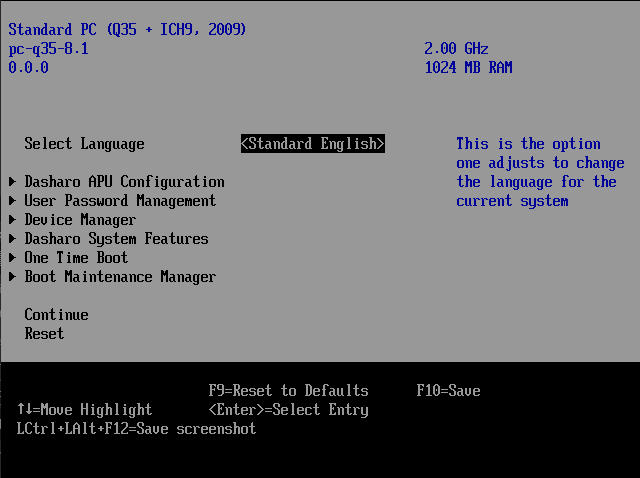
The page is the main view of the firmware setup application. It contains the
board model (MS-7D25), installed CPU and firmware version in the top-left
corner. In the top-right corner the CPU frequency and system RAM amount are
shown.
From the main page one may access all menus and submenus available in the firmware setup. Besides the menus there is also an option to:
- Change the language (currently only English is supported)
Continue- execute the top first boot order priorityReset- resets the platform.
The currently available menus/submenus are as follows:
- User Password Management - allows to set firmware setup password
- Device Manager - allows configuring various devices and features like: UEFI Secure Boot, TPM device, SATA and TCG OPAL password, etc. It may also contain informational menus like Driver Health Manager, Network Device List and others.
- Dasharo System Features - contains submenus for features specific to Dasharo products and Dasharo supported platforms
- One Time Boot - allows to choose which boot entry to execute. It simply lists all available boot options and allows to select one the same way as Boot Manager Menu
- Boot Maintenance Manager - allows to manipulate various UEFI standard variables responsible for console and boot options. One may choose which devices should be used for input and output, choose to boot an arbitrary file or modify the boot options and boot order.
NOTE: not all submenus may be available on your platform. Contact Dasharo Team for more information and possible feature extension of your platform.
User Password Management
User Password Management menu allows one to set firmware setup admin password:
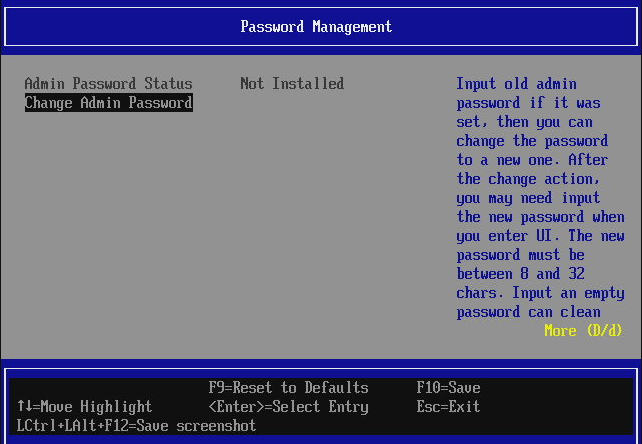
The password requirements are compliant to
modern standards. See Appendix A at pages.nist.gov.
The password doesn't need to contain anything more than lowercase letters
to allow for using passphrases. Choosing a strong password is recommended,
but not mandatory. Also the new password must be different from the last 5
passwords that were used before. The page shows the current status of
Admin Password if it is provisioned or not.
To disable the password, enter the User Password Management menu again and
request to set new password. You will be asked to enter current password. When
a window to provide new password pops up, leave the field empty and confirm it
twice with ENTER. The password installation status on the menu page should
change to Not Installed.
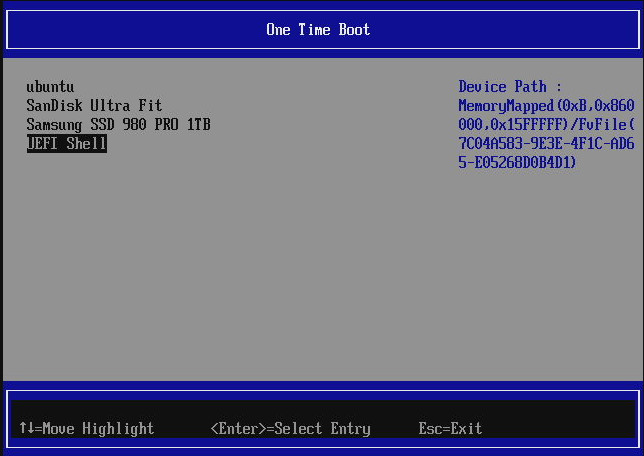
One Time Boot
When setup application is entered, one of the menus is called One Time Boot.
As the name suggests it allows to override the boot just one time (not
permanently). The usage principles are the same as for Boot Manager Menu.
Example view of One Time Boot submenu:
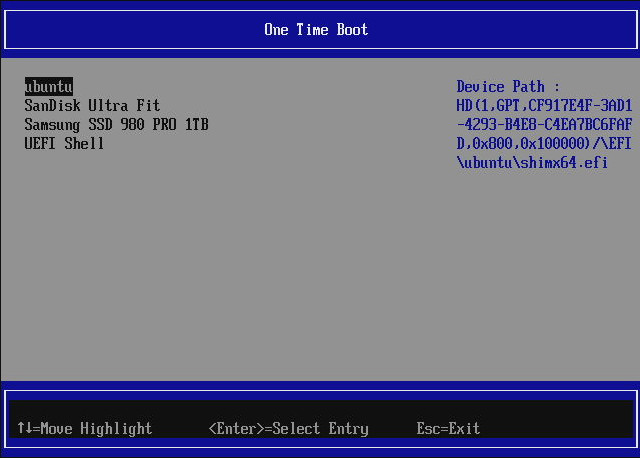
On the right side of the menu window, there is a DevicePath which is a
UEFI-compliant path to the device or file being executed. Depending on the
file/device type, these paths may be different:
DevicePaths are defined in UEFI Specification.
If you are interested in decoding those, read through the specification
carefully.
Boot Manager Menu
Boot Manager Menu is an application that lists all bootable options and allows one to override the boot path.
Boot Manager Menu is entered with a different key than setup application. It
may be customized on your platform. The right key to use is always printed on
the screen in the top-left corner, for example F11:
DEL   to enter Setup
F11   to enter Boot Manager Menu
ENTER to boot directly
After pressing the right hotkey for Boot Manager Menu, a window should pop up:
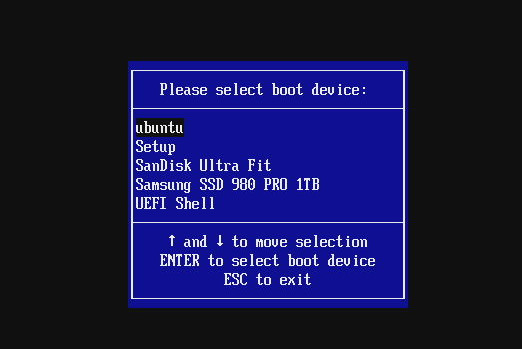
On the bottom of the window there are instructions for moving and selecting entries.